Fudashitatei’s pixel-art RPG FalseMyth is back with a sequel. False Myth 2 moves the stage from Rylan to the Great Temple of Valdia in the Vareruka domain. Rouge, hero of the first game, brings along Sylphina, a girl he pulled out of an arena whose emotions have been sealed away, and the two settle into school life at the temple while getting dragged into three overlapping power struggles: a church takeover, a criminal gang rising again, and a fight over a noble house’s inheritance
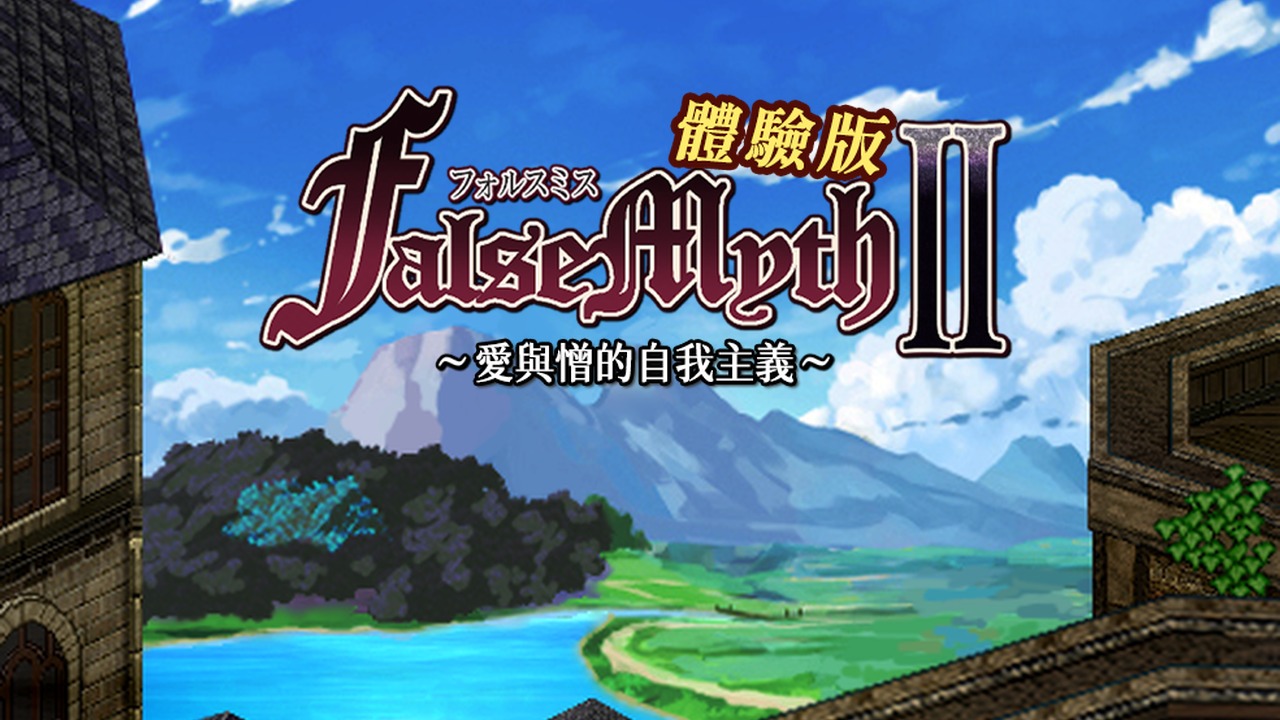
The loop is daily life, dungeon crawling and semi-real-time command battles. By day you work part-time jobs, go on dates, fish and build affection around the temple and Apprentice Street, and once the main story reaches certain points you head down into a dungeon. This walkthrough is based on the Traditional Chinese demo build (in-game title translated as “FalseMyth II Demo: Egoism of Love and Hate”) and covers the prologue, Chapter 1 and the first half of Chapter 2, which ends on a nasty cliffhanger. The Steam page lists a 2026 release, and this is the first time the series has voice acting, with six characters voiced by six voice actors
The focus here is prerequisite events. Several main story beats won’t show up until you’ve cleared a specific side event or raised your companion’s affection high enough. If you can’t find the next story trigger, check back here
Official Giveaway: 50 Winners, and the Secret Code Gets You 5 Entries
To celebrate False Myth 2’s upcoming Steam launch, the publisher is running a free “False Myth 2” prize draw on Gleam with 50 winners. Every winner gets both DLsite points and a Steam key, so there’s no picking one or the other
Each Winner Receives
- 2,000 DLsite points
- 1 Steam key for “False Myth 2”
9 Ways to Enter
| How to Enter | Entries |
|---|---|
| Add the game to your Steam wishlist | +10 (best value) |
| Join the akaeroCore Steam group | +3 |
| Visit the akaeroCore YouTube page | +1 |
| Follow @akaerocore on X | +1 |
| Repost @akaerocore on X | +3 |
| Post with #FalseMyth2 | +3 |
| Join the Discord server | +3 |
| Enter the secret code | +5 |
| Complete all other tasks | Bonus entries |
How to Use the Secret Code
FALSEMYTH2- Open the official giveaway page
- Find “Enter the secret code” in the list of entry methods
- Type FALSEMYTH2 to get 5 entries
The code only counts when entered on the official giveaway page. Check the official giveaway page for the deadline and eligibility
What Kind of Game Is This
- Genre: adult pixel-art RPG mixing daily-life sim, dungeon crawling and semi-real-time command battles
- Protagonist: Rouge, hero of the first game, always fights in the front line. The party is two front-liners plus one back-line mage
- Demo scope: prologue, Chapter 1 and the first half of Chapter 2. Three story dungeons: Moondeceit Forest, the Old Sewers and the Rotting Sea
- Endings: the demo has no branching endings. The main story is a single route, and after you escape the Rotting Sea, Sebas-chan tells you the demo is over
- Core loop: earn AP by living at the temple, spend AP on stat upgrades and shopping, then push the main story forward through affection and events
- What stands out: no main story choice locks you into a route, but progress is gated two ways (prerequisite events and companion affection), and some side events close for good as the story advances
- Languages: the demo ships with official Traditional Chinese. The Steam page lists Traditional Chinese, Simplified Chinese, English, Japanese and Korean (interface, voice and subtitles)
Story Background
Spoiler-Free Setup
After the war of aggression against Rylan ends, Rouge comes with Nagi, newly posted as an instructor, to the Great Temple of Valdia. The century-old academy has just been forcibly absorbed by the Rokutoniru Order and turned into one of its branches, and the administrator, Revian, has barely held on to the right to keep running it. On the way to Moondeceit Forest to retrieve the “Fruit of Eden,” Rouge rescues a girl named Sylphina from what looks like an arena. She always wears a perfect smile, yet she doesn’t react to anything at all
The temple normally can’t take in strangers of unknown origin, and Rouge is ready to leave with her, but the school doctor Jasmine bends the rules and lets the two stay on as “special-status disciples.” Rouge later learns that Sylphina’s smile is forced: a forbidden technique called the Heartseal has locked away every one of her emotions
Chapter 1: Getting the First Feeling Back
On Apprentice Street, Rouge’s group runs into Borusu and Kise, who throw their weight around thanks to their Senate family ties, Mana, who has just opened a shop, and Shuriku, a suspicious sister from the Order. To recover a gem Mana lost, the group heads into the long-sealed Old Sewers with Nagi along as chaperone. Deep inside, in the middle of real danger, Sylphina finally regains “joy” and turns into a cheerful girl who won’t let go of Rouge
Major Spoilers Below
Sakuya, an agent from the Senadio domain, shows up and reveals that Sylphina is actually “Sylphina Senadio,” legitimate daughter of the late lord Kaines, and that she is being hunted by her half-sister Veruka and by Pontiff Burudikku. Meanwhile Churio, a veteran merchant at the temple, turns out to be Chubatto, leader of the Bane of Amuda who was presumed dead ten years ago, and he is working with Shuriku to take over the temple
In Chapter 2, Riryei, a commoner disciple who has been bullied by Borusu’s gang for a long time, is forced to lure Rouge and Sylphina toward a sealed portal leading to the Rotting Sea, a top-tier danger zone, and she gets thrown in herself. At the end of the demo, Rouge is pushed to his limit by modified Bane of Amuda members inside the Rotting Sea and wakes up in a room he doesn’t recognize
Characters
Rouge
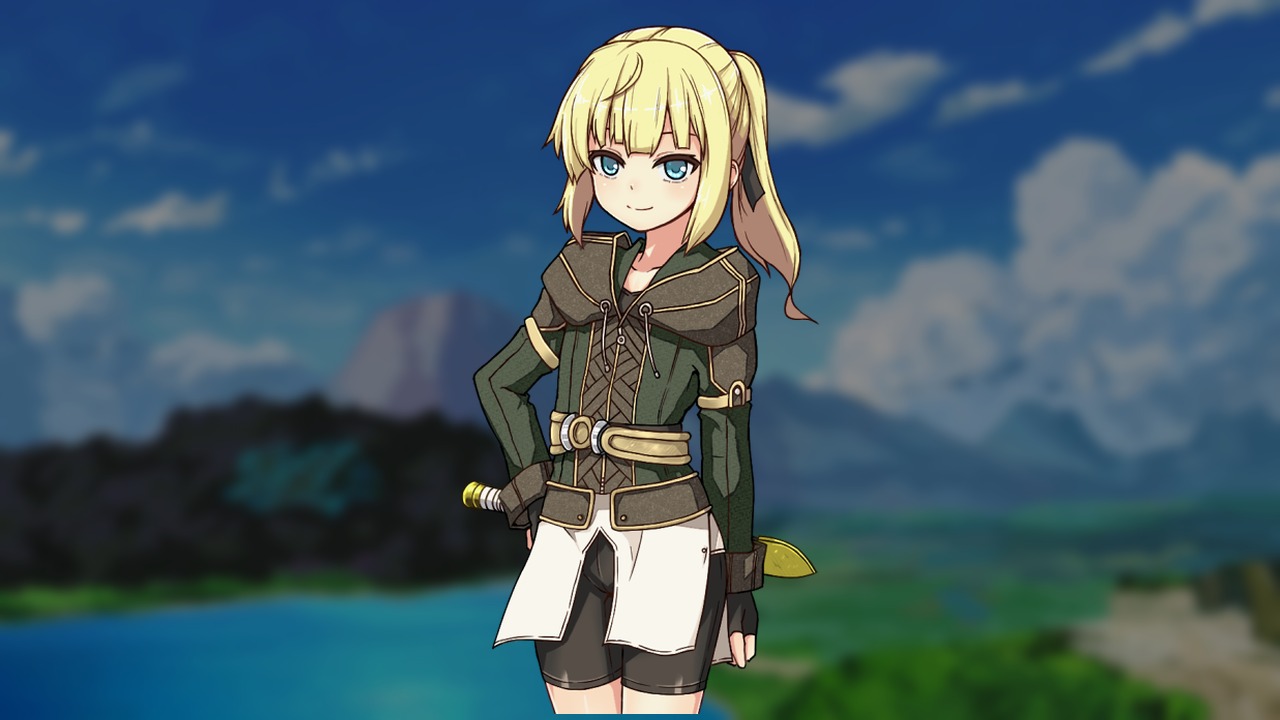
The first game’s protagonist and hero of the war against Rylan. He used to belong to the assassin group Shadow Hunters, and “Dira-fication” turned him from a girl into a boy, though he is still very pretty. Usually gentle and a bit airheaded, he turns into a little kid around chocolate, but his combat power is the highest in the game and he shows no mercy to anyone who picks on the weak. He is always in the front line and is the only character who can use Assassinate
Nagi

A Dira-human hybrid who has lived for thousands of years, now the new magic instructor and Rabibo keeper. In the first game she was an officer in the Order’s invasion mission; now she loves Rouge with everything she has. She is far stronger than the other instructors and serves as the back-line mage in the prologue and the Old Sewers. After that she mostly appears inside the temple as an instructor, and her room has its own interactions
Sylphina

The main heroine. Sealed by the Heartseal, she starts out only able to fake-smile and recite facts. After the Old Sewers she gets her joy back and becomes cheerful, clingy and a little sly. She knows enough to recite an entire monster encyclopedia. She is a back-line mage, and several main story events in the demo require her as your companion, so her affection directly decides whether the story can move forward
Romario
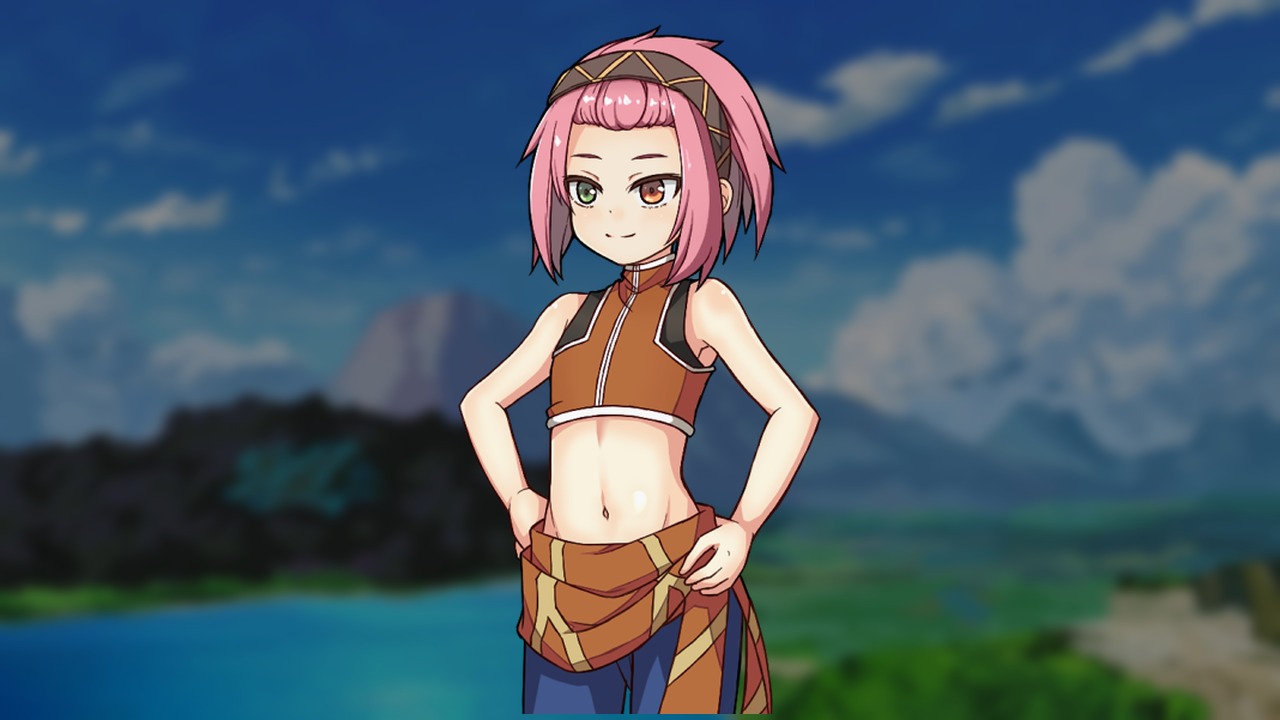
A “guest” disciple from the Dionkure knight family who calls himself a future general and adores his older sister. Sharp-tongued but soft-hearted, he likes to bite and heals with faith arts. In battle he excels at ↓ skills (traps) for causing stun, and his defense and healing are better than Rouge’s
Riryei
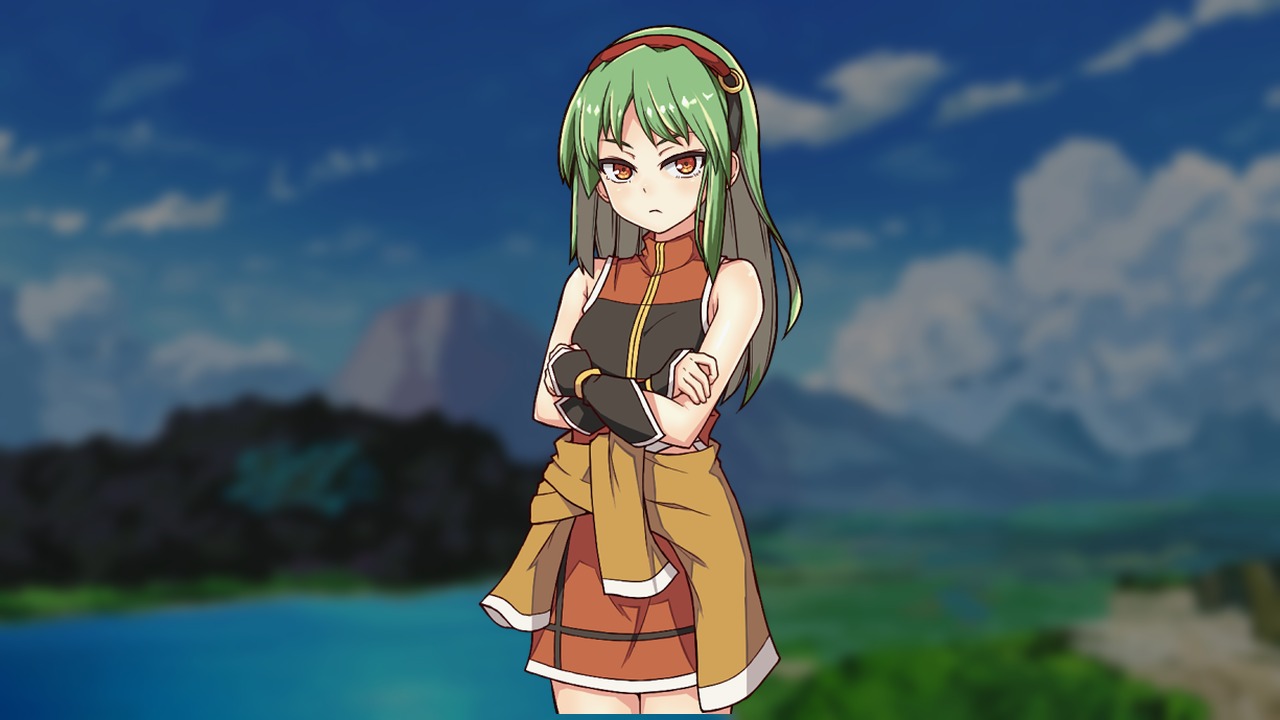
A first-year commoner with no family name who is good at sewing. Borusu and Kise have used her family as leverage to order her around for a long time, and she is forced to act against Rouge more than once. She joins the party in the Rotting Sea and fights with magic gear she made herself. She excels at ↑ skills (light attacks), hitting many times and building combos quickly, but her trap and defense ratings are the lowest tier
Temple Instructors
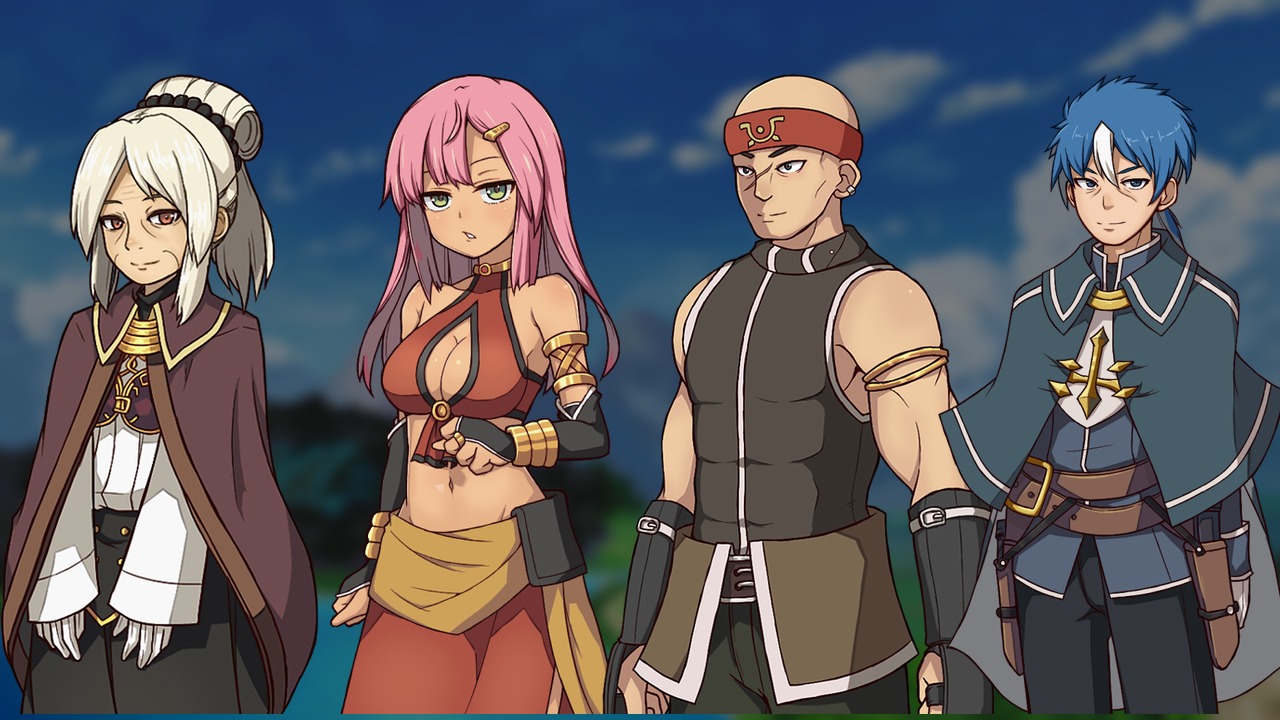
- Revian: the temple administrator, an elderly woman known as a wise ruler. Jasmine calls her “Grandma”
- Jasmine: the 21-year-old school doctor who calls herself a “Soul Healer,” a mind specialist. She is the first to notice Sylphina is under the Heartseal, and her special herbal tea is the whole temple’s nightmare
- Rick: the martial arts instructor, hot-blooded and a little rigid, willing to stand in front of his students as a shield
- Mashimo: a seasoned magician who can teleport objects. A realist who cleans up Rouge’s messes
Other Key Characters
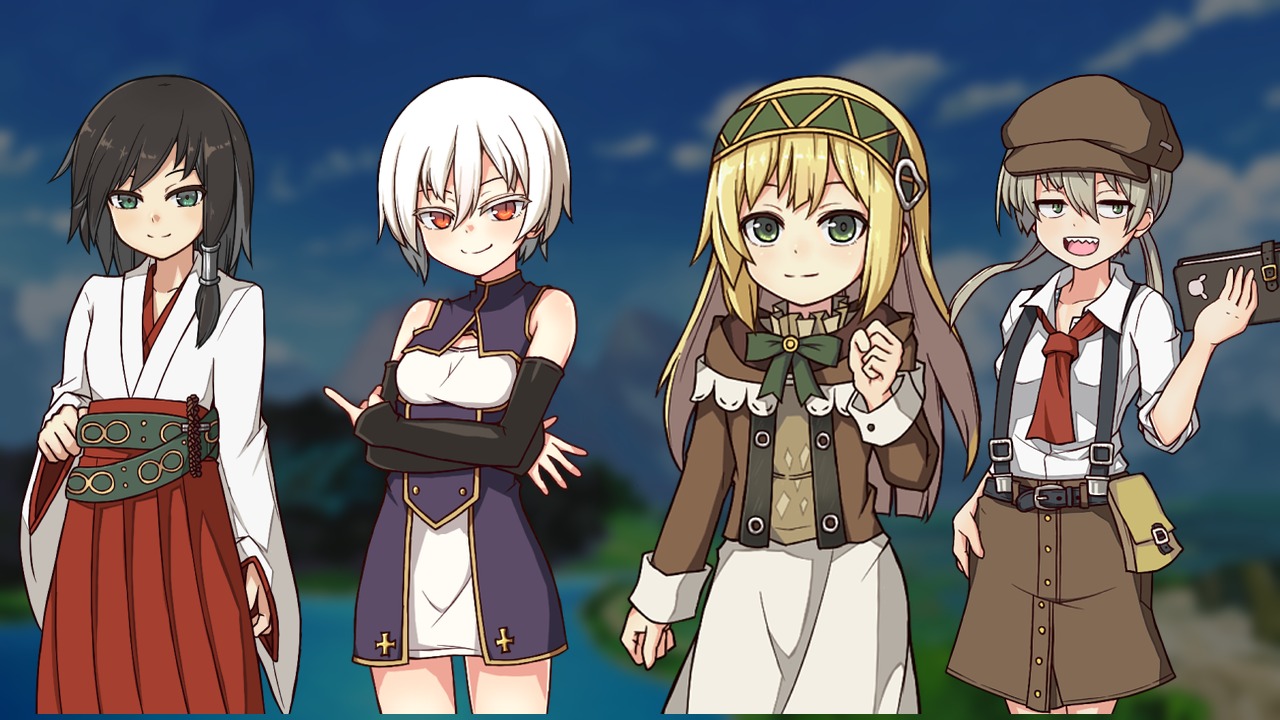
- Sakuya: an agent of the Senadio domain and an enemy from the first game, quietly steering Rouge toward protecting Sylphina
- Shuriku: a frivolous sister sent by the Order, who is really an Order intelligence agent
- Mana: a girl running a shop in a corner of the general store, younger sister of Rudo, the shopkeeper Rouge used to visit in Rylan
- Wechina: reporter for the temple’s free paper, the “Wechina Bulletin.” Her catchphrase is “my pick rating”
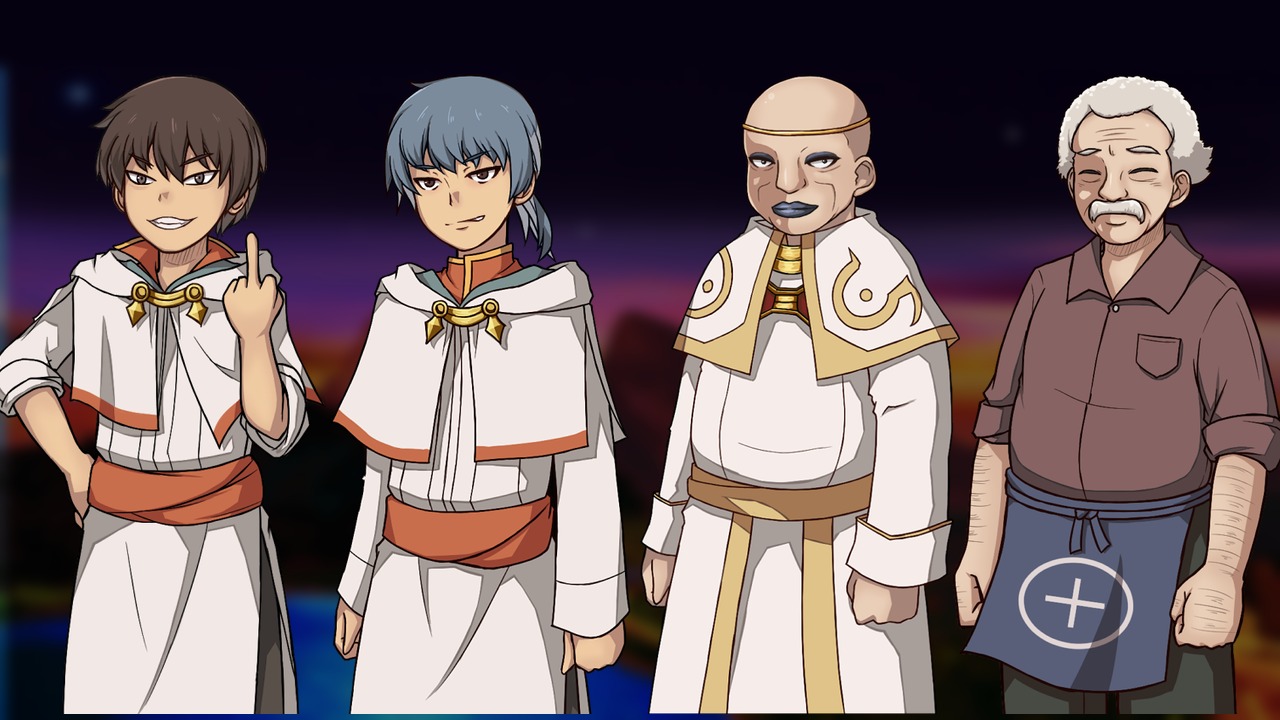
- Borusu and Kise: descendants of the imperial capital’s Senate, a bully duo who torment commoner disciples on Apprentice Street
- Burudikku: Pontiff of the Rokutoniru Order, who engineered the takeover of the temple and holds a grudge against Rouge
- Churio: a veteran handyman-merchant the instructors trust deeply. His real identity is revealed at the end of Chapter 1
Core Systems and Gameplay
Each day is split into several time slots. You move between the temple and Apprentice Street, spend time with companions and work part-time for AP. AP is both your upgrade currency and your money, and you earn it from fights, dungeon results, volunteer work and fishing. Main story beats show up as event markers on the map, and walking onto one triggers it once its conditions are met
Battle Basics
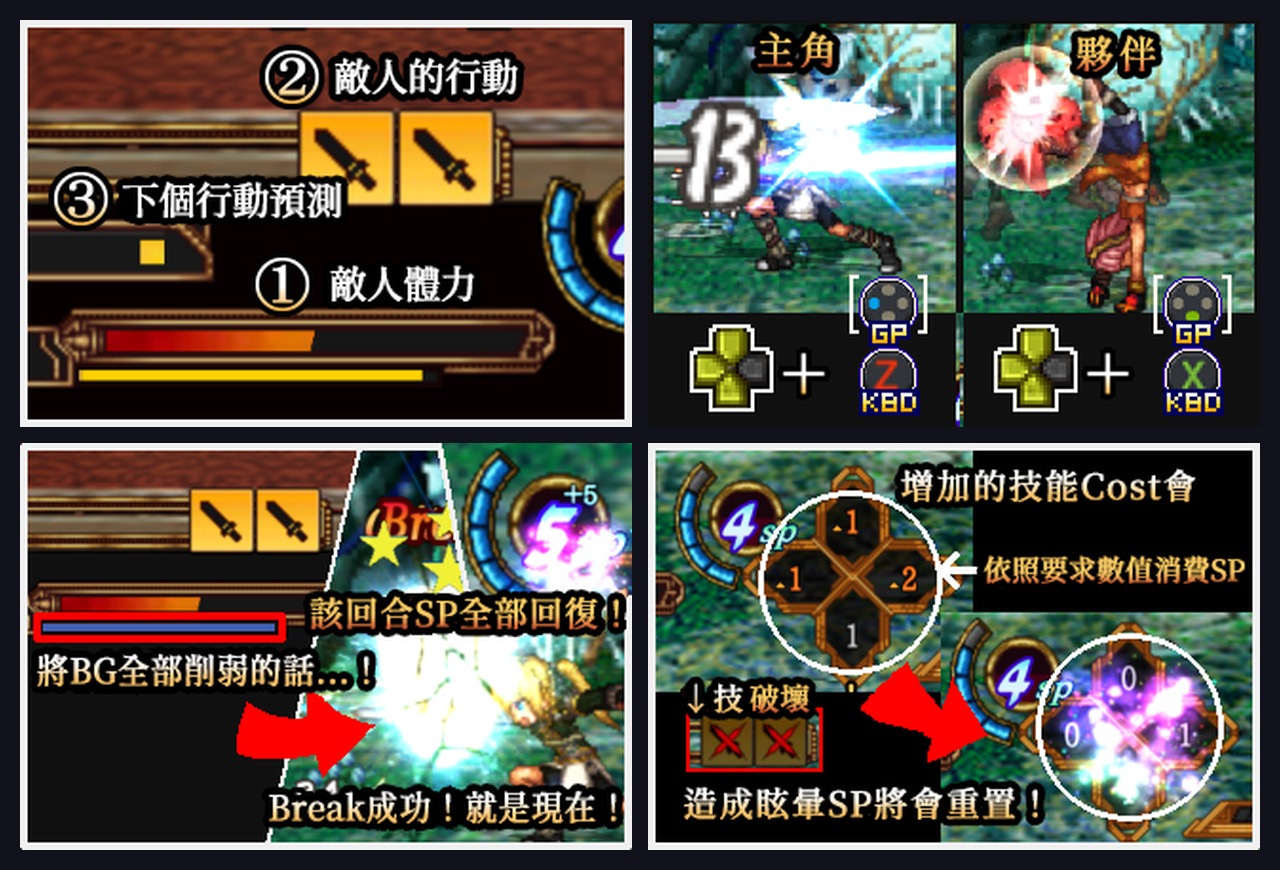
- On your attack turn, use arrow keys + Z for Rouge and arrow keys + X for your partner. Pressing both together or alternating them triggers chains
- ↑ skills are light attacks, ← skills are heavy attacks (they drain the enemy’s yellow BG balance gauge), ↓ skills are traps (they destroy the enemy’s action cards), and → skills are guards
- Using the same skill repeatedly raises its SP cost 0, then 1, then 2. This is the skill Cost
- Emptying the enemy’s BG triggers Break: every attack that turn becomes a critical hit and your SP fully recovers
- Destroying all of the enemy’s action cards triggers stun and resets your skill Cost
- The screen shows the enemy’s actions for this turn and a rough preview of next turn, so read ahead and decide whether to go for Break, go for stun, or guard
- When you’re out of SP you can rest: skill Cost slowly recovers and you get +2 extra SP
- If the battle runs past the turn limit, Rouge is forced to retreat
Back-Line Magic and Chanting
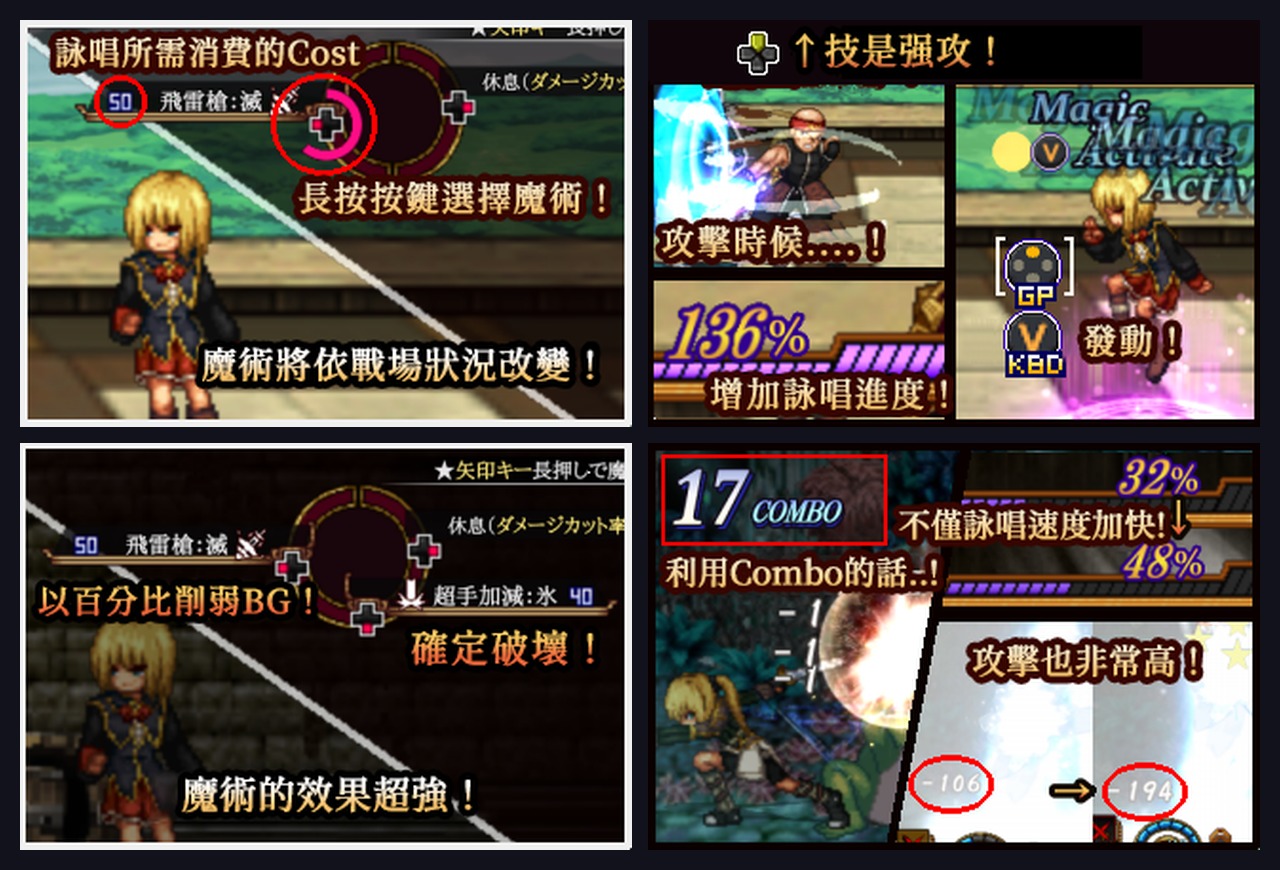
- The back-line mage’s chant advances with every front-line hit, so multi-hit ↑ light attacks fill it fastest. Press V to cast once the chant is done
- ↑ magic hits extremely hard but has a long chant, ← magic drains a large percentage of BG, and ↓ magic always destroys enemy action cards
- The back line has a Focus gauge that drops each turn and when taking damage. If it hits zero, the chant is forcibly cancelled
- The more hits you chain in a turn, the faster the chant and the stronger the spell
Dungeon Exploration and AP Chains
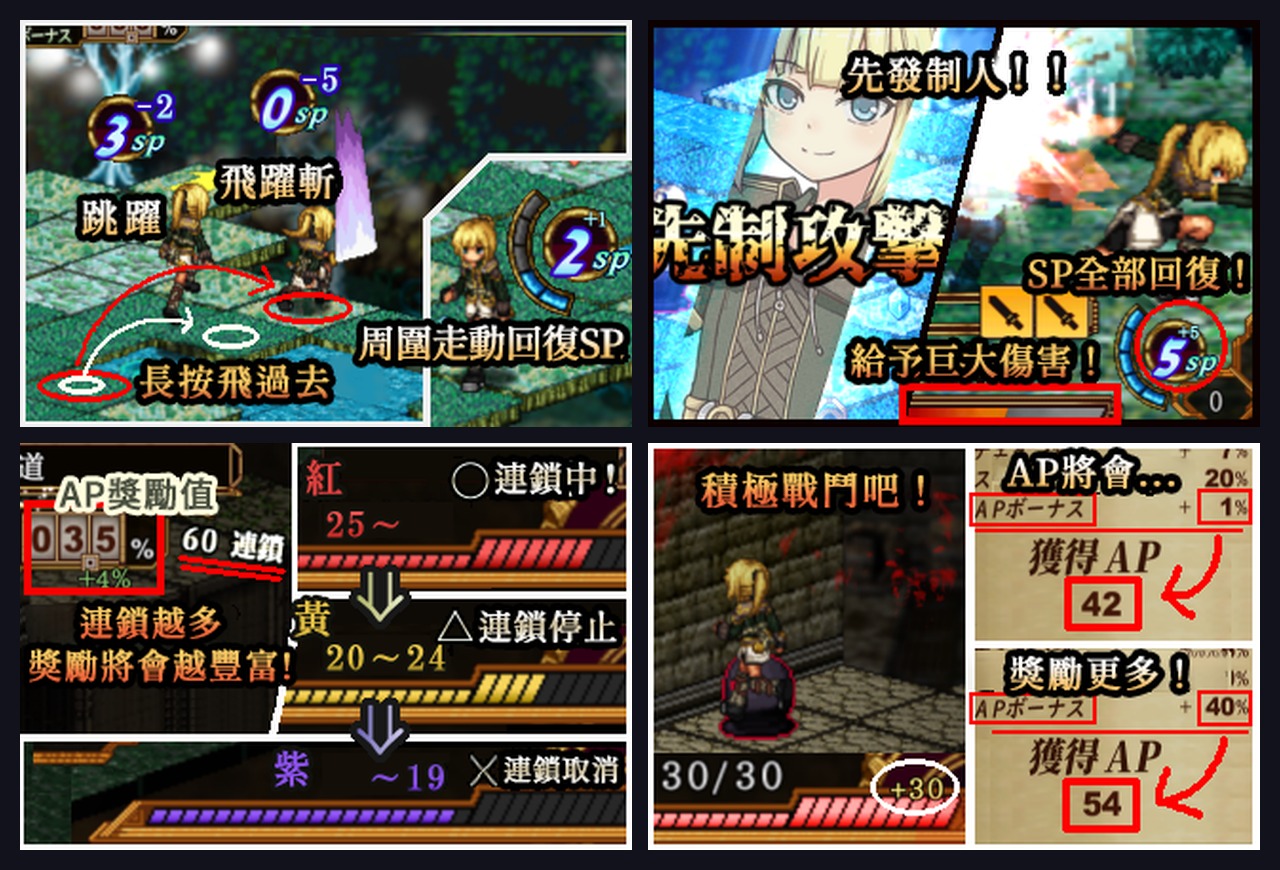
- Hold an arrow key in a dungeon to charge: one level is a Jump (2 SP), two levels is a Leap Slash (5 SP). Hitting an enemy with Leap Slash gives you a first strike and fully restores SP
- While your TP gauge is 25 or higher, moving builds a chain, and longer chains mean a bigger AP payout at the end. Each step costs 1 TP, and every battle refills it to 30
- Clear every adventure objective on the left side of the screen for an extra 20% AP at the end
- You have to collect every event on a map before you can move to the next one, and items can be hidden in shadows
- Enemy groups are tough but always drop a rare chest. If you’re not confident, go around them for now
Growth, Gear and Daily Life
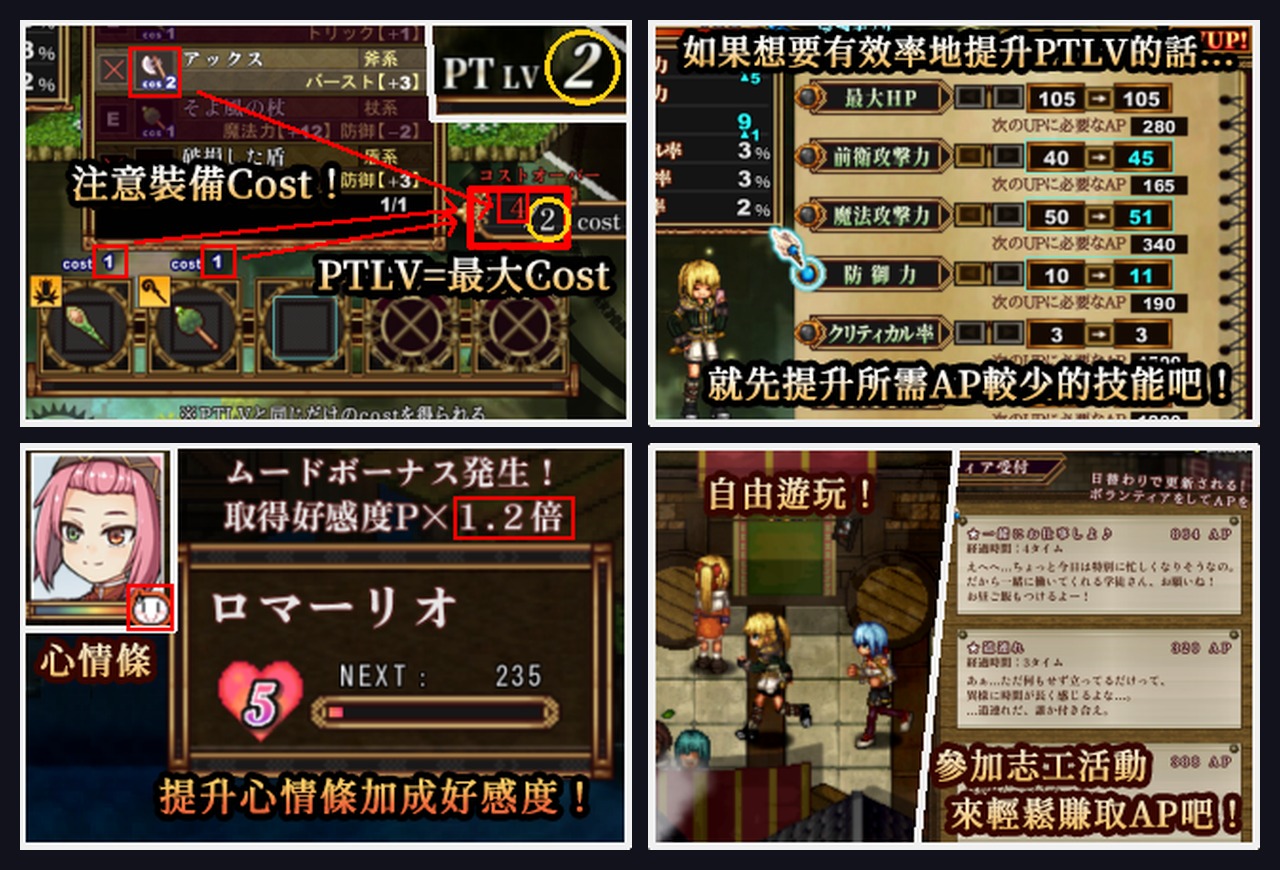
- Spend AP on stat gauges from the party screen in the menu. After enough upgrades, PTLV goes up by 1. Raising stats evenly is more efficient than maxing a single one
- Total gear Cost can’t exceed PTLV. Wearing 3 pieces with the same color attribute gives a set bonus (red ATK, purple MAG, blue DEF, yellow crit, black mark rate, green natural regen)
- Press C on the map to call a companion along for the arcade, snacks and so on. The heroine’s mood changes every morning, and doing “what she wants to do today” doubles how fast her mood gauge rises
- A higher mood gauge means more affection gained and more interactions unlocked. Perino Café gives a big chunk of affection at once, and eating there also restores energy and adds time to your day
- Short on cash? Do volunteer work at the South Tower for AP, and some requests also hand out meal tickets. Dining Hall meals give a big boost to front-line ATK
Fishing
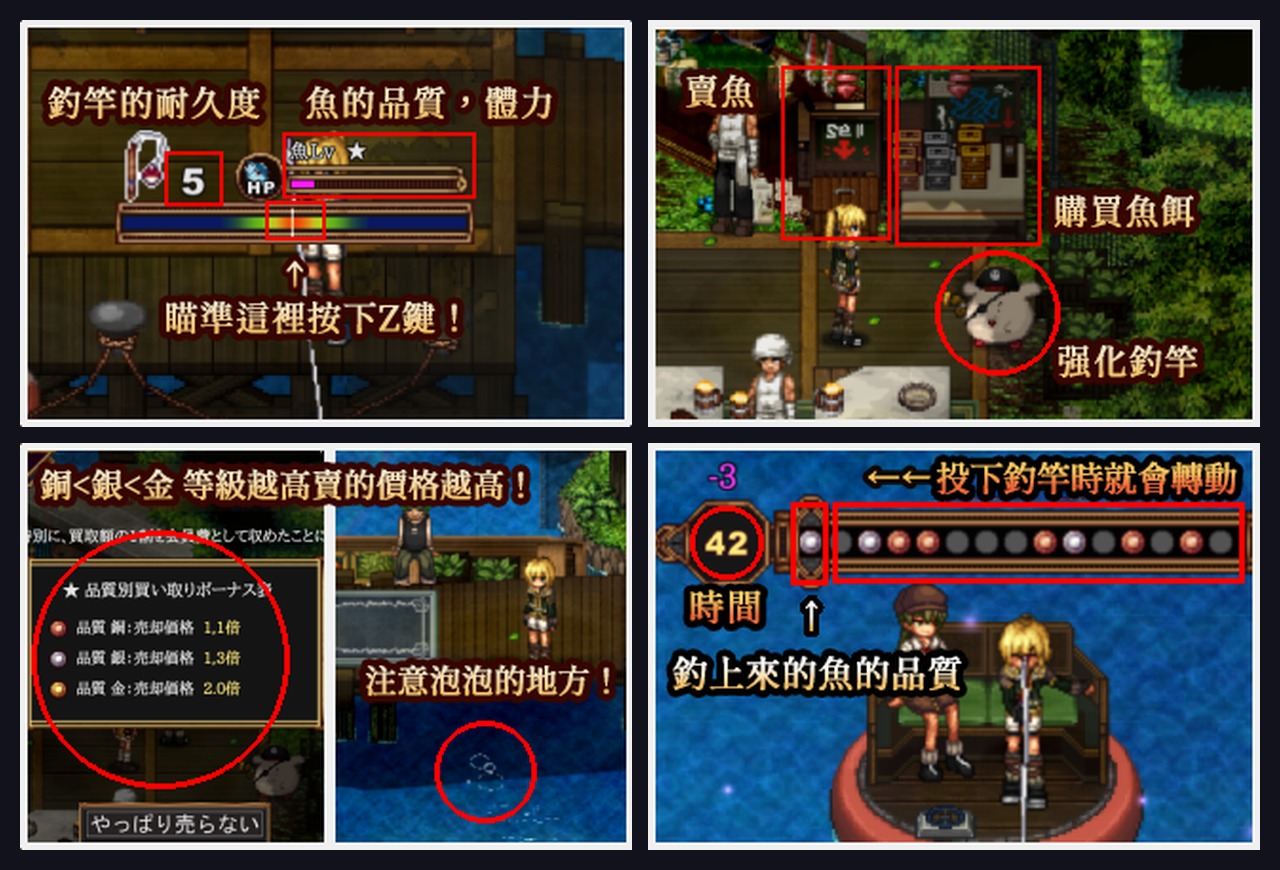
- Face the water and press ↓ + Z to cast. Once something bites, time your Z presses to wear down the fish’s stamina
- Fish quality goes normal, bronze, silver, gold, and higher quality sells for more. Casting at the bubbles on the surface always gets you bronze or better
- Getting the rod: after “The Chocolate-Loving Sister” in Chapter 1, go to the Courtyard to trigger the side event “Fishing Get!?”. Sylphina picks up an old rod from the Courtyard garbage dump, and from then on you can face the water and press Z to fish. This side event is also the prerequisite for “Stop the Thief!” in Chapter 2
- Joining the Fishing Club: after “Classroom Raid!?” in Chapter 2, go to the Vendor District to trigger the side event “Join the Fishing Club?”. Wechina, the rod’s original owner, lets Sylphina join, and only after joining can you drop fish into the buyback box next to the unmanned bait stand for AP
- Upgrading the rod: after joining, pay membership fees (in AP) to Captain Rabibo. Each membership level raises your rod’s durability by one level, which you need to land big fish. Joining itself is free
- Big fish bite more easily late at night, and the odds are roughly double on White Ro days. You can also fish in the Courtyard and at the North Tower. The demo only sells cheap bait
Read This Before You Start
- The main story is gated by prerequisite events: some chapter transitions only appear after you’ve seen a specific side event or companion event. See the full list under “Key Events and Branches” below
- Companion affection gates: “Stop the Thief!” in Chapter 2 needs Sylphina with you at affection Lv1 or higher, and “Classroom Raid!?” needs Lv2 or higher. Start raising her affection during Chapter 1 free time and the later gates get much easier
- Chapter transitions usually happen at bedtime: when the map hint says “Go back to your room and sleep,” head to the Workshop and rest to move on
- Time-limited side events: “The Chocolate-Loving Sister” and Sylphina’s companion event “Close Contact” close after the first main story event of Chapter 2. Both are also required to advance the story, so finish them in Chapter 1
- Map hints: the built-in map hint updates your next destination as the story moves. Check it first when you’re stuck
- Losing a battle isn’t an instant game over: pick “Try Again” (refills SP and restarts the fight) or “Help me, Sebas-chan” (fully restores HP and SP but takes 10% of your AP; you can cancel the support at her shop later)
- The demo caps AP at 3000
- Get the Warp Scroll early: during Chapter 1 free time, go to the West Tower to trigger “Sebas’s Shop!”. You get the Warp Scroll, which lets you travel quickly between maps (using it costs time), and this event is also the prerequisite for several later events
Full Walkthrough
Prologue: The Fruit of Eden and a Deathmatch Gone Wrong
- Moondeceit Forest Sanctuary: plays automatically. The temple is preparing the initiation ceremony, while Nagi and Rouge’s group receive the “Fruit of Eden” from the forest guardian at the sanctuary. Rouge also brings back Sylphina, whom he rescued from the arena
- Moondeceit Forest (dungeon): cross the forest back to the temple. This is where you learn dungeon movement and battle basics. Along the way you’re ambushed by Weepers and Bane of Amuda members, Sylphina gets taken hostage and rescued, and you finally escape on a teleport device
- North Tower 2F (Instructors’ Tower): the map hint reads “Where did the grown-ups go?” and you arrive ahead of Nagi. You meet Jasmine, Rick and Revian, and Rouge’s request to take Sylphina in is turned down
- South Tower: the gatekeeper Rabibo causes a commotion, triggering “A Deathmatch Gone Wrong.” You fight a giant mysterious monster at the Main Gate, and Nagi joins in to bring it down. When it revives, Nagi burns it away completely with magic
- Nagi’s Room: triggers “Intimate Time with Nagi-chan” (mandatory)
- Go back to your room and sleep: triggers “Prologue End,” showing a secret meeting between Pontiff Burudikku and Gil, then Chapter 1 begins
Chapter 1, Early: Initiation Ceremony and the Apprentice Street Tour
- Workshop: “Chapter 1 Begins.” On the day of the initiation ceremony you try to leave the temple and get stopped by Sister Shuriku, until Jasmine arrives and announces the two of you may stay with disciple status
- South Tower Infirmary: “The Girl Who Lost Her Feelings.” Jasmine diagnoses Sylphina with the Heartseal, and Rouge decides to stay by her side until he finds a cure
- Main Gate: leave the South Tower by its southwest exit and head toward the Main Gate to trigger “The Roma Expedition!”
- Vendor District: talk to the Rabibo watching the boats and ride over to Apprentice Street, triggering “Welcome to Apprentice Street.” Follow the guide around the Green District and the general store
- Dining Hall: once you have a meal ticket, take the stairs south of the general store up to trigger “Arriving at the Dining Hall”
- General Store: “Those Are Thugs,” your first run-in with Borusu and Kise
- Main Gate: “Mana’s Request.” Agree to help Mana recover the gem that got kicked into the drain
Chapter 1, Middle: The Old Sewers
- Sewer entrance: head down from the Main Gate and you’ll see it. Rouge simply cuts open the gold-lock door, and Nagi comes along as supervisor
- Old Sewers (dungeon): you meet Riryei, who came looking for her disciple ID, and she tags along for a while. This is also your first fight alongside Sylphina
- Deepest part of the sewers: “The Awakened Heart.” The mysterious figure who has been tailing the group appears and the boss fight starts. Afterward Rouge and Sylphina nearly fall, and when they come out the exit into the Courtyard, something strange happens in Sylphina’s chest
- South Tower Infirmary: “Feelings Come With a Lover.” Sylphina regains “joy.” This unlocks the companion system (press C on the map to call someone)
- Main Gate: set Sylphina as your companion to trigger “With Cheerful Sylphina” and spend a whole day with her on Apprentice Street
- Go back to your room and sleep: “Staff Meeting,” where the instructors learn who Sylphina really is. Afterward you can visit the Administrator’s Office to watch Nagi’s “The Legend of Rouge,” a recap of the first game
Chapter 1, Late: Sakuya’s Request and Free Time
- Workshop: triggers “Rouge Gets Teased,” “A Honey Trap Called a Thank-You” (mandatory) and “Rouge Off the Rails?” in that order. Sakuya reveals Sylphina’s identity and entrusts her to Rouge, and from here you can move freely
- West Tower: trigger the side event “Sebas’s Shop!” to get the Warp Scroll and open Sebas’s shop. This is the prerequisite for the next three events, so do it first
- Green District: “The Bane of Amuda.” A drunk causes trouble in front of Perino Café, and Mashimo privately warns Rouge to watch out for the Bane of Amuda
- Courtyard: side event “The Chocolate-Loving Sister,” where Shuriku has built a chapel in the Courtyard. Required, or Chapter 1 won’t end
- Workshop (with Sylphina as companion): companion event “Close Contact.” Required, or Chapter 2 won’t start
- Workshop: optional side event “I Want a Pet!”
- Apprentice Street, Classroom 2 (optional): side event “The Guardian Golem Joins!” opens the Subjugation Challenge; “Nagi’s Lesson 1” explains AP allocation
- Use this stretch to raise Sylphina’s affection, because Chapter 2 asks for Lv1 and then Lv2 back to back
- Go back to your room and sleep: “End of Chapter 1, Part 1” shows Churio and Shuriku meeting secretly in the sewers and reveals who Churio really is. Sleep again to trigger “Chapter 2 Begins”
Chapter 2, Early: The Theft Case and the Classroom Raid
- Courtyard: trigger the side event “Fishing Get!?” first to open up fishing. This is the prerequisite for the next main story event
- Main Gate (Sylphina as companion, affection Lv1 or higher): “Stop the Thief!” You chase the thief who stole Mana’s goods, and it turns out to be Riryei
- South Tower: “Wechina Bulletin,” where you meet the reporter Wechina. From here you can do the side event “Jealous Nagi” (Workshop), and after “Classroom Raid!?” you can also do “I Want a Pet! 2” (Connecting Corridor 1) and the companion event “Intimacy Practice”
- West Tower (Sylphina as companion, affection Lv2 or higher): “Classroom Raid!?” Borusu’s gang attacks mid-class with real swords
- Vendor District (optional): side event “Join the Fishing Club?”. You can only sell fish and upgrade your rod after joining
- North Tower 2F: “Rouge Suspended,” where Rouge gets suspended
- Go back to your room and sleep: “Threat Beneath the Surface.” You need to have seen “Jealous Nagi” first
Chapter 2, Late: Riryei and the Rotting Sea
- Stairwell: side event “The Girl’s True Face,” where Riryei meets the new student Sari. Required, or the next main story event won’t appear
- Rooftop: “Utterly Brutal Treatment.” Rouge climbs the wall to rescue Riryei from her bullies
- Workshop: “Asking for Help.” Riryei still refuses help
- Go back to your room and sleep: “After the Midnight Rescue.” Late at night Riryei comes asking for help, and you agree to meet up during the field training in the Adato Forest
- Connecting Corridor 2 (Sylphina as companion): companion event “Intimacy Practice.” Required, or the next part won’t appear
- Workshop: “Where the Journey Ends.” Romario refuses to come along
- East Corridor: head east to the teleport device and set out into the Rotting Sea
- Rotting Sea (dungeon): rescue Riryei, who was thrown into the Rotting Sea, and she joins the party. Use antidote herbs to build a shelter and rest, then you run into modified Bane of Amuda members and the boss fight starts
- End of demo: Rouge wakes up in an unfamiliar room, and Sebas-chan announces that the demo story ends here
What You Can Do After the Demo Ends
- Sebas-chan asks whether you want to go back to the temple. Picking “Send me back!” costs 10% of your AP, and afterward you can train and earn money freely at the temple. Your party stays as it is, with no story restrictions
- The Rotting Sea opens early as a free dungeon. You can buy access from Sebas-chan, and it is quite difficult
- To return to where the demo ended, talk to Sebas-chan at the teleport point
Key Events and Branches
The demo’s main story has no choices that split the route. What you do need to watch are the events in the table below, which block progress until you clear them, and the time-limited events that close as the story moves on
| Locked Main Story Event | Must Clear First | Location | Other Conditions |
|---|---|---|---|
| The Bane of Amuda | Sebas’s Shop! | West Tower | None |
| End of Chapter 1, Part 1 (bedtime) | The Chocolate-Loving Sister | Courtyard | Closes after the first main story event of Chapter 2 |
| Chapter 2 Begins (bedtime) | Close Contact | Workshop | Needs Sylphina as companion and “Sebas’s Shop!” cleared first; closes after the first main story event of Chapter 2 |
| Stop the Thief! | Fishing Get!? | Courtyard | Needs Sylphina as companion, affection Lv1 or higher |
| Classroom Raid!? | None | West Tower | Needs Sylphina as companion, affection Lv2 or higher |
| Threat Beneath the Surface (bedtime) | Jealous Nagi | Workshop | None |
| Utterly Brutal Treatment | The Girl’s True Face | Stairwell | None |
| Where the Journey Ends | Intimacy Practice | Connecting Corridor 2 | Needs Sylphina as companion; available right after “Classroom Raid!?”, so you can do it early |
Optional Side Events
| Side Event | Location | When It Appears | Notes |
|---|---|---|---|
| I Want a Pet! | Workshop | Late Chapter 1 until the demo ends | Requires “Sebas’s Shop!” first |
| The Guardian Golem Joins! | Apprentice Street | From late Chapter 1 | Afterward you can take on the “Subjugation Challenge” at the Apprentice Street entrance counter |
| Nagi’s Lesson 1 | Classroom 2 | From late Chapter 1 | AP allocation tutorial: raise stats evenly early on and prioritize PTLV |
| Join the Fishing Club? | Vendor District | After “Classroom Raid!?” in Chapter 2 | Requires “Fishing Get!?” first; unlocks selling fish and rod upgrades |
| I Want a Pet! 2 | Connecting Corridor 1 | After “Classroom Raid!?” in Chapter 2 until the demo ends | Missable |
Boss Guide
Mysterious Monster (Prologue: A Deathmatch Gone Wrong)
- Location: the temple’s Main Gate, triggered at the South Tower after the North Tower scene
- Tips: a story fight against a boss with huge HP. Nagi joins in the back line, so your front line’s job is landing hits to push her chant while her magic does the real damage
- Afterward: the monster revives and Nagi finishes it off in a cutscene
Mysterious Figure (Chapter 1: “The Awakened Heart,” deepest part of the Old Sewers)
- Location: deepest part of the Old Sewers
- Tips: it gets more actions and more cards than the regular enemies along the way, which makes it a real pain. Prioritize Romario’s ↓ skills to destroy its action cards and stun it, and guard whenever the next-turn preview shows a heavy hit coming
- Afterward: you escape the sewers and Sylphina regains joy
Modified Bane of Amuda Members (Chapter 2: Rotting Sea)
- Location: inside the Rotting Sea dungeon
- Tips: noticeably more HP than the enemies along the way. The Rotting Sea’s poison keeps building up as you explore, so sort out your SP and status before going in. In the fight, use ← skills to Break and refill SP, keep your damage up, and don’t let it drag on
- Afterward: leads into the demo’s ending scenes
Subjugation Challenge: Goblin Warrior
- How to unlock: clear the Apprentice Street side event “The Guardian Golem Joins!”, then sign up at the Apprentice Street entrance counter. This is the only challenge available in the demo
- Restriction: defeat it within 15 turns
- Tips: the official hint says to use shields when enemy damage runs high, and it specifically recommends bringing Romario. Use his ↓ skills to shut down its action cards and his → skills to block heavy hits, and you can ride out the high-damage turns safely
Key Items and Gear
| Item | How to Get | Use |
|---|---|---|
| Warp Scroll | West Tower side event “Sebas’s Shop!” | Press Z on the map to travel quickly to where you want to go; costs time |
| Meal Ticket | Handed out by Jasmine during the story, and from some volunteer requests | Trade for the daily set meal at the Dining Hall. You can only hold one, so use it as soon as you get it |
| Antidote Herb | Gathered in the Rotting Sea | Emergency treatment for Rotting Sea poison; used in the story to build a shelter |
| Bait | Unmanned bait stand | For fishing. Better bait makes big fish easier to catch |
How to Read the Gear Stat Tables
The level of gear dropped by chests depends on dungeon difficulty. Moondeceit Forest, the Old Sewers and the Rotting Sea in the demo are all difficulty 2 or lower, so chests only give level 1 to 2 gear. The tables below list every piece in that range
- Total Cost can’t exceed PTLV, so prioritize low-Cost, high-stat gear. When stats are equal, the rarer piece usually has the lower Cost
- ATK affects front-line damage, MAG affects back-line magic, Impact boosts heavy attacks (BG drain), Trap Rate boosts the success rate of ↓ disruption skills, and Mark Rate raises the chance of Rouge’s Assassinate marks appearing
- The numbers in the tables are base values. When you actually get a piece, each stat has roughly a 40% chance to roll higher (more variance at higher levels), so the same item can end up 1 to 2 points above the table
- Gear has roughly a 15% chance to come with an attribute, shown as a colored orb in the top left of the card: red = ATK, purple = MAG, blue = DEF, yellow = crit rate, black = mark rate, green = natural regen rate
- Set bonuses only kick in at 3 or more pieces of the same color, and more pieces mean a bigger bonus. ATK, MAG and DEF give 115% at 3 pieces, 150% at 4 and 200% at 5; the other three colors give 110%, 125% and 150%. You start with only 3 gear slots and can wear 4 to 5 pieces later
- Rarity is shown in-game as R, SR or UR. Normal gear has no mark (listed as “Normal” in the tables)
- Some gear also lowers DEF, shown as a negative number
- Hitting the AP reward target in a free dungeon gives you a fixed rare piece of gear: the “Great Axe” in the Old Sewers and the “Sword of Zoru Iruen” in the Rotting Sea
Gear Stats: Swords
| Icon | Name | Level | Rarity | Cost | Stats |
|---|---|---|---|---|---|
 | Fist Blade | 1 | Normal | 1 | ATK +6, DEF -3 |
 | Long Sword | 1 | Normal | 1 | ATK +3 |
 | Rapier | 1 | Normal | 2 | ATK +5 |
 | Kufingar | 2 | R | 1 | ATK +8 |
 | Short Scimitar | 2 | Normal | 1 | ATK +5 |
 | Double-Edged Sword | 2 | Normal | 1 | ATK +10, DEF -8 |
 | Hook Sword | 2 | Normal | 2 | ATK +8 |
Gear Stats: Spears
| Icon | Name | Level | Rarity | Cost | Stats |
|---|---|---|---|---|---|
 | Bamboo Spear | 1 | Normal | 1 | Trap Rate % +1 |
 | Militia Spear | 1 | Normal | 2 | Trap Rate % +2 |
 | Flame Lance | 2 | R | 1 | DEF +2, Trap Rate % +3 |
 | Long Spear | 2 | Normal | 1 | Trap Rate % +2 |
 | Twin-Pronged Spear | 2 | Normal | 2 | Trap Rate % +3 |
Gear Stats: Axes
| Icon | Name | Level | Rarity | Cost | Stats |
|---|---|---|---|---|---|
 | Pickaxe | 1 | Normal | 2 | DEF -3, Impact +3 |
 | Axe | 1 | Normal | 2 | Impact +2 |
 | Club | 1 | Normal | 3 | Impact +3 |
 | Battle Axe | 2 | Normal | 2 | Impact +4 |
 | War Hammer | 2 | R | 2 | Impact +6 |
 | Hand Axe | 2 | Normal | 2 | DEF -6, Impact +5 |
 | Wooden Mallet | 2 | Normal | 3 | Impact +5 |
Gear Stats: Bows
| Icon | Name | Level | Rarity | Cost | Stats |
|---|---|---|---|---|---|
 | Short Bow | 1 | Normal | 1 | Mark Rate % +1 |
 | Long Bow | 1 | Normal | 2 | Mark Rate % +3 |
 | Crossbow | 2 | R | 1 | Mark Rate % +4 |
 | Magic Bow | 2 | Normal | 1 | Mark Rate % +2 |
 | Iron Fang | 2 | Normal | 2 | Mark Rate % +4 |
Gear Stats: Gauntlets
| Icon | Name | Level | Rarity | Cost | Stats |
|---|---|---|---|---|---|
 | Leather Gloves | 1 | Normal | 2 | Crit Rate % +1 |
 | Monster Cat Claws | 2 | R | 1 | ATK +2, Crit Rate % +4 |
 | Cat Claws | 2 | Normal | 1 | Crit Rate % +4 |
Gear Stats: Staves
| Icon | Name | Level | Rarity | Cost | Stats |
|---|---|---|---|---|---|
 | Breeze Staff | 1 | Normal | 1 | MAG +8, DEF -3 |
 | Twig | 1 | Normal | 1 | MAG +4 |
 | Heavy Staff | 1 | Normal | 2 | MAG +6 |
 | Church Staff | 2 | Normal | 1 | MAG +14, DEF -6 |
 | Disciple’s Staff | 2 | Normal | 1 | MAG +6 |
 | Witch’s Broom | 2 | R | 1 | MAG +10 |
 | Glass Staff | 2 | Normal | 2 | MAG +10 |
Gear Stats: Shields
| Icon | Name | Level | Rarity | Cost | Stats |
|---|---|---|---|---|---|
 | Pot Lid | 1 | Normal | 1 | DEF +1 |
 | Broken Shield | 1 | Normal | 2 | DEF +2 |
 | Warrior’s Shield | 2 | Normal | 1 | DEF +3 |
 | Mage’s Shield | 2 | R | 1 | MAG +5, DEF +4 |
 | Warrior’s Greatshield | 2 | Normal | 2 | DEF +5 |
Gear Stats: Armor
| Icon | Name | Level | Rarity | Cost | Stats |
|---|---|---|---|---|---|
 | Light Hide Armor | 1 | Normal | 1 | Max HP +5 |
 | Leather Armor | 1 | Normal | 1 | Max HP +10, Crit Rate % -1 |
 | Heavy Leather Armor | 1 | Normal | 2 | Max HP +10 |
 | Great Lizard Armor | 2 | R | 1 | ATK +2, Max HP +11 |
 | Light Iron Armor | 2 | Normal | 1 | Max HP +7 |
 | Iron Armor | 2 | Normal | 1 | Max HP +14, Crit Rate % -1 |
 | Heavy Iron Armor | 2 | Normal | 2 | Max HP +14 |
Gear Stats: Remedies
| Icon | Name | Level | Rarity | Cost | Stats |
|---|---|---|---|---|---|
 | Nagi’s Charm | 1 | Normal | 1 | Auto Regen % +1 |
 | Popo Leaf | 2 | R | 1 | Auto Regen % +8 |
 | Medicinal Herb | 2 | Normal | 1 | Auto Regen % +4 |
H-Scene List
The demo has 4 adult scenes, all of which can be rewatched in Recollection once seen. Two are mandatory main story scenes, and the other two are companion events with Sylphina that also double as main story prerequisites, so you can’t miss any of them
| Recollection Title | Event Name | Characters | Location | Trigger | Type |
|---|---|---|---|---|---|
| Vacuum Nagi! | Intimate Time with Nagi-chan | Nagi | Nagi’s Room | After “A Deathmatch Gone Wrong” in the prologue | Mandatory main story |
| A Honey Trap Called a Thank-You | A Honey Trap Called a Thank-You | Sakuya, Sylphina | Workshop | After “Rouge Gets Teased” in Chapter 1 | Mandatory main story |
| Secret Skin-to-Skin | Close Contact | Sylphina | Workshop | Late Chapter 1, with “Sebas’s Shop!” cleared and Sylphina as companion | Prerequisite for Chapter 2 to start |
| Intimacy Practice | Intimacy Practice | Sylphina | Connecting Corridor 2 | After “Classroom Raid!?” in Chapter 2, with Sylphina as companion | Prerequisite before setting out for the Rotting Sea |
- Anytime, anywhere interactions: after “Close Contact,” you can press C on the map to make a special request of the heroine traveling with you. At first it only works in the Workshop, and once the conditions are met it works everywhere. Doing it while her mood gauge is high earns a lot of affection
- Nagi: she has no affection level, so as long as she’s in her room you can visit her for interactions any time
Impressions and Who It’s For
There’s a solid amount of story in this demo. From the prologue to the first half of Chapter 2 it packs in temple politics, a criminal gang, an inheritance dispute and school bullying, and every one of those four threads reaches a real turning point within the demo. The daily-life scenes are dense with banter and character moments, and the bickering between Romario and Nagi is a nice change of pace
It hits hard emotionally too. Sylphina going from a doll-like fake smile to her first genuine laugh, and Riryei being pushed to the point of writing a suicide note and begging on her knees to protect her family, are scenes that stick with you. The latter involves school bullying and threats of violence, so players sensitive to those themes should be ready for it
- Good fit for: players who like story-heavy pixel RPGs with strong characters, and anyone who enjoys a “raise stats by day, crawl dungeons” rhythm. Fans of the first game get to see what happened to Rouge and Nagi, plus plenty of callbacks to the original
- Heads-up: the main story is gated by prerequisite events and affection, so players used to just pushing forward will get stuck. Keep this guide or the in-game map hints handy. The battle system throws a lot of information at you, so take your time with the early tutorials
- Need to play the first game? The story stands on its own, so you can jump in without the first game, and the Administrator’s Office has a recap if you want to catch up
Official HCG Promo Art
This is a promo image released by the publisher. The text on it says every scene in the full version has HCG, presented with pixel animation, illustrations and voice acting together
This media contains 18+ content
Please confirm that you are at least 18 years old before viewing this media.
Game Information
| Title | False Myth 2 (this guide is based on the Traditional Chinese demo, in-game title translated as “FalseMyth II Demo: Egoism of Love and Hate”) |
|---|---|
| Developer | Fudashitatei |
| Publisher | akaeroCore |
| Platforms | Steam (releasing 2026) / DLsite Japanese version (released April 2025) |
| Steam Languages | Traditional Chinese, Simplified Chinese, English, Japanese, Korean (interface, voice, subtitles) |
| Genre | Adult pixel-art RPG (daily-life sim, dungeon crawling, semi-real-time command battles) |
| Demo Scope | Prologue, Chapter 1, first half of Chapter 2 |
| Endings | No branching endings in the demo |
Where to Buy False Myth 2
Steam: Wishlist False Myth 2 on Steam
DLsite (Japanese version): Buy the Japanese version of False Myth 2 on DLsite
You may also like: Room 404: Erotic Massage Walkthrough: LV1~20 Unlocks, Item Prices, 3 Hour Full Clear
※ Steam lists the game for a 2026 release and it is not out yet. Wishlisting it is also the giveaway task with the most entries
Gentlemen, together, we go strong!